The Autoplay feature in SPOTIO is the hub of the field sales engagement platform. It gives sales teams the tools they need to maximize sales rep productivity and improve overall activity management.
Autoplay Settings
Before working with Autoplays, it is important to set up Autoplay permissions for Managers and Sales Reps, and to configure your Company’s Autoplay settings.
Set Up Autoplay Permissions
Default Permissions:
- Sales Reps and Managers are able to create, edit, and delete Autoplays they have created.
- Managers are able to edit or delete Autoplays owned by Sales reps.
- Sales Reps and Managers can add contacts to Autoplays that have been shared with them.
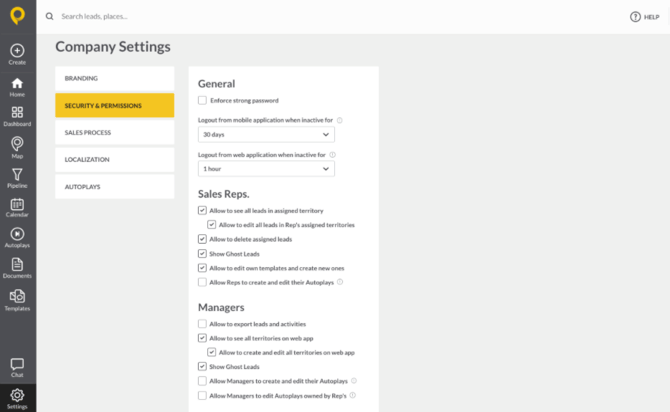
To configure permissions for Managers and Sales Reps:
- Click the Settings gear.
- Under General, select SECURITY & PERMISSIONS.
- Check or uncheck the boxes:
- Sales Reps - Allow Reps to create and edit their Autoplays
- Managers - Allow Managers to create and edit their Autoplays and/or Allow Managers to edit their Autoplays owned by Reps
- Select SAVE.
Note: Autoplays can only be edited prior to adding contacts.
Configure Company Autoplay Settings
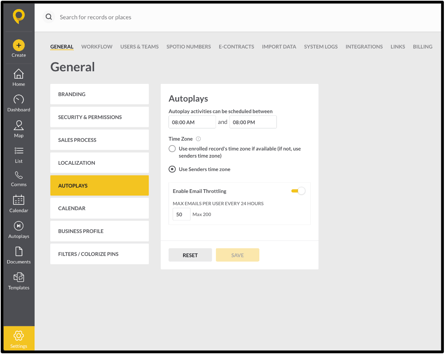
To ensure Autoplay steps occur at optimal times, Admins can configure the times between which Autoplay activities can be scheduled, as well as set throttling limits.
To configure these settings:
- Click the Settings gear.
- Under General, select AUTOPLAYS.
- Adjust the daily start time and end time which Autoplay activities can be scheduled.
- Select the time zone from either the enrolled record’s time zone or Sender’s time zone.
- Toggle on or off Email Throttling and set the maximum number of emails per user within a 24 hour period.
- Hit Save.
Creating Autoplays
From the Web App
There are three steps to creating an Autoplay:
- Configure the Autoplay Settings
- Add the Autoplay steps
- Enroll Contacts in the Autoplay.
Configure the Autoplay Settings
To create a new Autoplay you will have to login into the SPOTIO web app.
- Once you're logged in, select the Autoplays icon on the left gray sidebar.
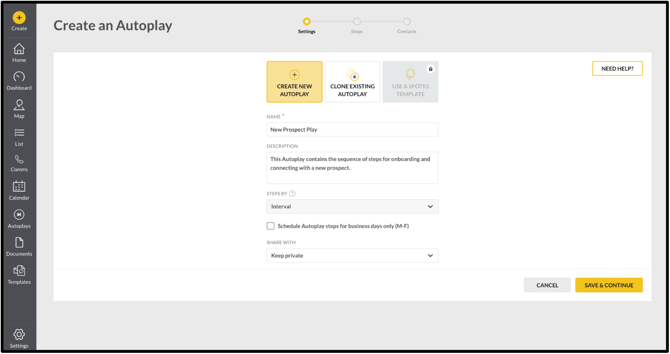
- Select CREATE NEW.
- Add and adjust the following settings:
- Name the Autoplay: Give the Autoplay a name that reflects its purpose and makes it easy to distinguish from other Autoplays. Ex: New Prospect Play (Please note that no two Autoplays may share the same name).
- Give the Autoplay a Description: This optional step is useful for helping the sales team understand the purpose of the Autoplay and under which circumstances it should be used.
- Set the Timing for the Autoplay Steps
- STEPS BY Interval allows the Autoplay creator to configure the time interval between each step. For example, if your first step is a call and you want a reminder to follow up the text with an email 48 hours later, you can create the second step with a 2-day interval.
- Optionally, you can also limit Autoplay steps to occur only on business days.
Sharing Your Autoplay:
- Keep Private: Prevents the Autoplay from being viewed or used by anyone other than the Account Admin role.
- Others can view and clone it: Prevents others from adding contacts to the Autoplay but does allow others to view or clone the Autoplay if desired.
- Others can use and clone it: Allows others the ability to add contacts to the Autoplay and clone the Autoplay if desired.
Once you have completed your Autoplay, click SAVE & CONTINUE.
Note: Once the Autoplay Settings have been saved, the Autoplay is created and saved. From this point you can continue in the Create Autoplay workflow or return later to add steps and enroll contacts.
Create Steps for the Autoplay
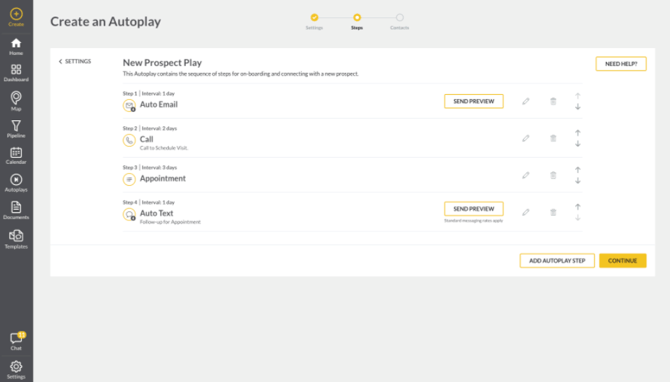
The next step in creating an Autoplay is to add all of the steps in sequential order. For example, you might begin the Autoplay with an introductory email, followed by a step to schedule a visit or video call. You may choose to include additional steps for closing the sale and a final step for thanking the customer for their business.
- Click ADD AUTOPLAY STEP.
- Select the Activity Type for Step 1.
The available activities are:
- AUTO EMAIL: An email is automatically sent to the contact at the specified day and time.
- AUTO TEXT: A text is automatically sent to the contact at the specified day and time.
- TEXT
- CALL
- OTHER ACTIVITY: Select from a list of the company’s Custom Activities.
Please note that Multichannel Communications is required for access to the Auto Text activity type. A Sales Rep can integrate their email and use it with Autoplays independently of the other Multichannel Communication text capability.
Pro Tip: Use Templates for Email and Text activities. This will allow you to modify the template to reflect changes in the Autoplay. If you have typed out the body for either and need to make a change, you are unable to if contacts are enrolled. To learn more, check out the MCC: Creating Email and Text Templates.
3. Adjust INTERVAL. Select the Days, Hours, And Minutes between enrolling the contact and when Step 1 will be triggered. This allows you to customize the frequency of the message.
4. Schedule REMINDER.
5. Optional DESCRIPTION.
6. Click CONTINUE.
The next step will vary depending on the activity chosen. If you have chosen Auto Email or Email, you will have a subject line and body required. If you have chosen Auto Text or Text, you will be required to enter a body. Selecting Call and Other Activity will give you the option to add Task Details.

Tip: When using Email or Text activities, insert variables to the body of your message. This will allow SPOTIO to pre-fill in information.
- After entering the required step details, click SAVE STEP
- Click ADD AUTOPLAY STEP to add another step
- Reorder steps in an Autoplay
- Using the up and down arrows to the right of the Autoplay step, you can adjust the order of an existing Autoplay. Remember, once you have added Contacts to an Autoplay you can no longer reorder the steps. You can clone the Autoplay, and with the new Cloned Autoplay that has no contacts in it the steps can be reordered.
- Send Preview
- To test the layout and the content of your message, you can click Send Preview. The MCC system will send a sample email or text to the users SPOTIO integrated email address or to their cell number to give them assurance that the message their customers will see is accurate.
- When you are done adding steps to the Autoplay, click CONTINUE
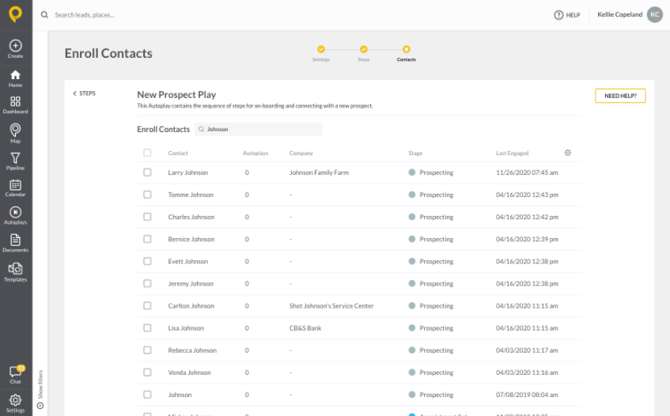
Enroll Contacts (Web & Mobile)
- Use the Search for Contacts feature to search for specific leads or contacts.
- You may also view additional contacts by clicking LOAD MORE.
- Select the contacts you wish to enroll in the Autoplay
- Note: Using the standard filters in the SPOTIO web app, you can filter out contacts that may not pertain to the Autoplay you’ve built. For example, you can filter out Won leads from the Autoplay because you may be intending to only communicate with current Leads and not customers you’ve already sold.
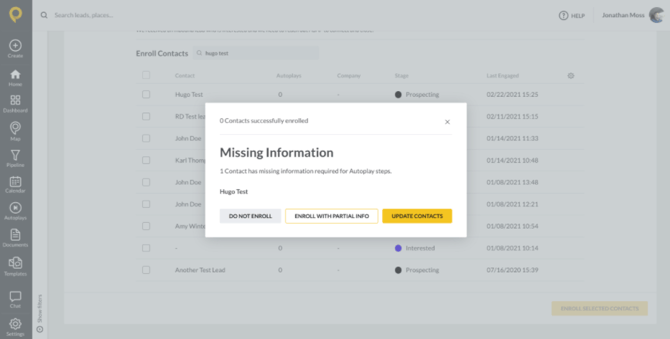
- Click ENROLL SELECTED CONTACTS
When enrolling contacts into an Autoplay, you are still able to enroll them with partial contact info.
Enrolling contacts into an Autoplay from the mobile app:
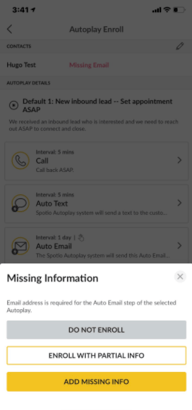
- If the Autoplay progresses to an automatic step (i.e., Auto email or Auto text) and the contact’s info is missing, the sales reps will receive a message in the Notification Feed and also in the Lead Screen: Autoplay details view.
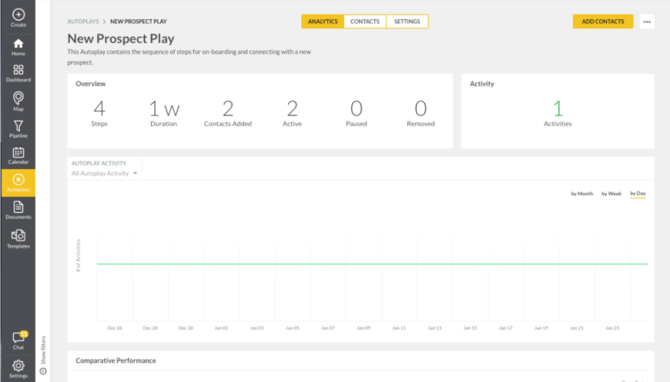
- When you have finished enrolling contacts, click VIEW AUTOPLAY to return to the page where you can view and manage the Analytics, Contacts and Settings for the new Autoplay.
Pause, Clone or Archive an Autoplay
- Because you can’t edit an Autoplay once a Contact has been added to it, we’ve built the capability to Clone it and then edit it.
- Whenever you Archives an Autoplay all of the contacts are removed from this Autoplay and they don’t receive any future notifications.
Using the Analytics
- High level benefits include:
- Create benchmarks for the right frequency, cadence and messaging require to maximize sales performance
- Identify opportunities for testing, improving and refining active Autoplays before scaling across larger sales organizations
- Gather insights into how Autoplays are performing by rep, customer profile, etc and replicate across the sales organization
- Available statistics
- # of Active Autoplays -
- # of Contacts Enrolled
- % of Contacts Enrolled
- Activity
- # of Activities complete
- # of Emails Sent, Opened, Bounced, Failed, Pending and Clicked
- Top Performing Autoplays (based on MCC open rate)
- Autoplay Comparative Performance graph is the component that helps a team test and measure the success of a particular template.
- Time Series Graph showing all activities
- Filtered by Autoplay activity type
- Includes both standard and custom types
- Summary communication statistics by type (only for MCC customers)
- Emails
- Texts
- Calls
- Snapshot graph to display quantity of all Custom Activities
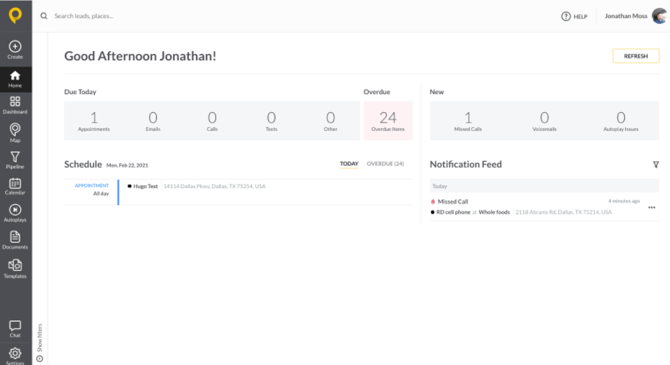
Home Screen & the Notifications Feed
Now that you have built the Autoplays and begun enrolling contacts into the Autoplays, how do Sales Reps maintain awareness of impending steps for any given contact/Autoplay?
- Home Screen - each Sales Rep has their Home Screen with all scheduled activity for that day. It can be filtered for types of Activities to provide even great focus for the type of work to be done that day.
- Notifications feed - in the Home Screen is a real-time notification feed that shows all inbound calls, texts and emails. It also shows if there are any Autoplay issues that need to be solved (i.e., missing contact info on a pending Autoplay action)
Here is the mobile view of the same screens:

In Company Settings Admins have the ability to control whether Reps can create and edit their Autoplays. Also, options exist to allow manager to create and edit their own Autoplays as well as the Autoplays owned by Sales Reps (see screenshot).
How do Autoplays benefit a field sales rep?
- Automates multichannel communication follow ups so nothing slips through the cracks
- Allows reps to keep a clear mind, executing only the sales activities outlined for them in a given day.
- Drives deep customer engagement by staying on top of communication activities